How to Fix Hum in Your Wurlitzer Electronic Piano (Or Other Vintage Amp): Part II
This part of the guide focuses on hum originating in the amplifier.
In Part I of our guide on fixing hum, we listed some easy fixes. In Part II, we’ll go into further detail on techniques that require some prior electronics experience to execute. It’s worth checking out Part I first, because it listed some simple, non-invasive things that you should always be tried before diving into the amplifier’s circuitry. For the purposes of this article, we’ll assume that you already tried everything in Part I. This includes:
Ensuring that the hum is coming from the piano itself, and not from dirty mains power or other devices in the room, such as fluorescent lights
Ensuring that everything is tightly screwed in place
Confirming that all of the Wurlitzer’s shielding is present and functioning correctly
Replacing the tubes with known good tubes
Confirming that the wiring harness is free from obvious faults
Ensuring that noisy wires, such as wires leading to the power switch or the power transformer, are not in close proximity to sensitive preamp or speaker wiring
As in Part I, we also assume that hum is the worst problem in your Wurlitzer. If there is something else wrong with your Wurlitzer’s electronics, you should address that first. In the process, you may gain intel about the source of the hum.
Safety Notes
Audio amplifiers, and tube amplifiers in particular, contain high voltages. Do not attempt to repair an amplifier without following the appropriate safety protocols, including (but not limited to) discharging the electrolytic capacitors. Note that electrolytic capacitors can pose a shock hazard even in the amp is turned off and unplugged.
Even if you don’t plan on opening up the amp chassis, always unplug the Wurlitzer before removing its lid. The terminals of the switch always have mains voltage across them when the amplifier is plugged in, even when it isn’t turned on! Furthermore, student model Wurlitzers may have mains voltage in unexpected places, such as ports for the umbilical cord that once connected the various classroom keyboards to each other.
No amplifier is worth compromising your health and safety over, but getting shocked by a marginally-functional hum-bucket only adds insult to injury. So be careful and make safe choices! If you’re not sure how to safely proceed at any point, there’s no shame in asking a tech (like us!) to take over.
How does hum enter a circuit?
First of all, you should be aware of two major ways that hum can enter your signal:
Failing components
Physical proximity of sensitive signal components to noisy, high-current components
It is often true that a component can fail in a way that introduces hum into a circuit. However, it is also possible that an otherwise totally functional component is picking up hum through its physical proximity to some noisy component. This is known as capacitive coupling. Basically, some components carry such noisy currents that they radiate magnetic fields outside the bounds of their wires. The noisy component is often called the aggressor, while the component that is absorbing its noise is the victim.
Noisy, aggressor components include:
Preamp components are very sensitive. That’s why the Wurlitzer 200a preamp is on a separate circuit board from the main amplifier. This circuit board is mounted above the reed bar.
Power transformers
Mains wiring (i.e., wires to the switch and the mains fuse)
Output transformer secondary wiring (i.e., wires to the speakers, external speaker jacks, or headphone jacks)
Wiring associated with the output section, including output tubes
Wiring associated with the rectifier
Wiring associated with the power supply and filter capacitors, particularly early filter capacitors
Tube heater wiring
Sensitive, victim components include:
Wires and components connecting any input jack - including the phono input - with any component, particularly the grid of a tube
The grid of any tube, whether or not its an input
Wiring leading to and from the volume pot
Any wiring that is re-entering the amp from some exterior device, such as the return jack of an fx loop or reverb unit
As you examine the amplifier, you should take particular note of any of the above components. Where are they located? What are they adjacent to? Are their wires short or long? As a general rule, short wires have fewer opportunities to pick up noise, while long wires can become dislodged from their original placement and end up somewhere they shouldn’t be.
Also note that this is not an exhaustive list of components that can experience crosstalk. There are many components that are only moderately sensitive, but can easily pick up noise if they are in the wrong place at the wrong time.
Step 1: Isolate the Problem
First, we need to narrow down the source of the hum as closely as possible. If we can gather some clues about the source of the hum, we’ll be able to solve it faster, with the least amount of unnecessary work. For this step, it helps if you’re familiar with the general signal path of an amplifier. If you have the schematic in front of you, even better.
The input jack in a Wurlitzer 200 (specifically, a Wurlitzer 206) amplifier. Check whether the hum is present with the reed bar disconnected from the input. Always turn the amp off and unplug it before disconnected the input. The switch is only inches away, and you can get shocked by mains wiring if the Wurlitzer is plugged in and you accidentally touch the switch terminals.
Does the hum change with volume level? If the hum changes with the volume level, the culprit is probably something situated in the signal path before the volume knob. It may be a failing component or some sensitive preamp component picking up noise through capacitative coupling. On the other hand, if the hum is unaffected by the volume knob, the source of the noise is probably something located late in the preamp or in the amp’s output section.
Note that this test indicates where the hum is entering the signal - not necessarily where the component generating the noise is. For instance, hum that increases with volume may be due to a failing component in the power supply that is injecting noise into the signal path of the input triode. And although this is a useful test, it’s not specific enough to start replacing components. You’ve only ruled out half the amp.
Repeat this analysis with any other pots that the circuit may have, including trimpots, the record level pot on a 112, and the tremolo pot. If any pot increases the hum, noise is somehow entering into the circuit at a point earlier than that potentiometer.
Does the amplifier still hum when the reed bar input is disconnected? If the amp is quiet after the reed bar is disconnected, there is a problem with your Wurlitzer’s shielding. More information on shielding can be found here. If the amp has an unacceptable noise floor even with the reed bar out of circuit, there is a problem somewhere in the amplifier.
Is the hum present in all inputs and outputs? The inputs and outputs vary by Wurlitzer model. It’s worth checking whether the noise is present in all of them.
Input jacks. Some Wurlitzer models have a second input jack that is marked Record or Phono. In most cases, these inputs are positioned in the circuit very close to the main input jack. They have so many common components that they will probably sound equivalent to the main input. If the record input is clean and the main input is noisy - after accounting for reed bar noise - the problem is likely in the main input jack, the input coupling cap, or possibly the reed bar power supply resistor.
An exception is the Wurlitzer 112 amplifier. Here, the record input is connected to a different triode than the main input. If the Wurlitzer 112’s input is clean, but the main input is noisy (again, after accounting for reed bar noise), the issue is likely a component in the input triode circuit.
Aux outputs. Most early models of Wurlitzer only have external speaker outs. However, 200-series Wurlitzers have aux outputs that take their signal from somewhere in the preamp. If the aux output is clean but the speaker is noisy, there is probably an issue somewhere in the phase inverter or output section of your amplifier.
Note on speaker load.
Make sure that, for all tests, there is a speaker load connected to your amplifier. Operating a tube amp without a speaker can damage the output transformer. Solid state amps can better tolerate having no speaker load for short periods of time, but the power transistors in early solid state amps, such as the Wurlitzer 140b, are very delicate and should always be connected to the proper load.
However, you can disconnect the onboard speaker as long as there is a speaker of the proper impedance connected to the external speaker. Plugging into the headphone jack should also be safe as long as the load resistor is in good shape. Note that it is not sufficient to plug into an aux output, because these are connected to a point in the preamp and do not provide a speaker load.
Step 2: Take non-essential elements out of circuit.
The Wurlitzer 112 record input can be a source of noise. It is situated outside the chassis, which is not the optimal design.
Another good test is to remove auxiliary portions of the circuit. If that improves the noise floor, you know that the problem lies in the out-of-circuit portion of the amp. This includes:
Extra inputs, such as the phono input
Extra outputs, such as the external speaker out or a headphone out
Effects such as tremolo
Aux outputs, particularly if they are not original to the amplifier
When taking elements out of circuit, be sure to remove them as completely as possible. Cut them out from their closest connection to the main circuit. For instance, do not remove the phono circuit by just cutting the wires at the input jack. Instead, cut the wires where they connect to the signal path, until all of the phono components are completely out of circuit. This is because the phono circuit connects to the tube grid, which is a sensitive area. If the phono components were victims of capacitative coupling, they may continue to transmit noise to the grid unless they are totally disconnected from it - even if the phono jack itself isn’t connected.
In a tube amp, a similar test is removing the tubes one-by-one. If removing a tube reduces the noise, the problem probably lies in the corresponding circuit for that tube. However, you need to be able to identify whether the noise is gone because the tube’s circuit was causing it, or for another reason, for instance because removing the tube cut the signal path to the speaker. For that reason, the test is best performed on tubes that power signals which are nonessential to the amp’s basic functionality.
Bonus Step: Remove the wiring harness. This test is complicated because you can’t just pull the wiring harness and turn the amp on, because the switch is located on the volume pot. For that reason, you will have to wire some sort of alternative switch. This is an advanced modification that is outside the scope of this article. But if you have the know-how to accomplish this, pulling the wiring harness out-of-circuit will tell you if a flaw in the wiring harness is introducing noise into your amplifier.
Step 3: Examine the internal components of the amplifier for wear and tear.
Sometimes, you can tell that a component has failed due to its physical appearance. To examine the circuit components, unplug the amplifier from the speaker and mains power and remove it from the Wurlitzer. (If you have a 112, this you’ll have to unsolder these connections in order to get it out of the Wurlitzer.) Place it upside down on a surface that provides support to the output transformer, so that the amp lies flat and doesn’t wobble. Do not touch any components without draining the filter capacitors first.
These capacitors, found in a Wurlitzer 200 amplifier, must be replaced, because they are physically leaking.
Examine the components as you have examined the wiring harness. Look for loose or missing solder joints, connections bridged by debris, and damaged lengths of wire. Are any resistors cracked or burnt-looking? Are any capacitors bulging or visibly leaking? Don’t forget to check the leads of the filter capacitor can for evidence of damage. If you need to move a component, use a non-conductive wooden chopstick or orangewood stick (not a pencil).
All damaged components should be replaced. If you see similar components of the same brand or style elsewhere in the amplifier, treat them with suspicion. They may also have deteriorated, even if their external condition doesn’t look as bad.
Make sure that signal wires are physically separate from heater wires and wires containing unfiltered AC. Any wires containing unfiltered AC are a potential source of hum. This includes heater wires, transformer wires and wires leading to the power switch. These should be tightly twisted and kept away from signal wires as much as possible.
Sometimes, these wires are twisted very loosely inside of a Wurlitzer. In that case, they should be unsoldered and re-twisted. Sometimes the transformer wires were left relatively long and need to be nudged into a better position.
Are there obvious modifications or replacement in components in the amp? If so, make sure any modifications to the amplifier were completed correctly. If all of the components are factory-original, it’s probably safe to assume that the Wurlitzer worked correctly at one point or another. (Well, maybe. We have seen a 206 where one of the original blue capacitors was installed backwards.) But there’s no guarantee that a user-installed mod ever worked at all. It’s completely possible that someone installed some components incorrectly, broke the Wurlitzer, and then abandoned the whole thing in frustration. It’s also possible that the mod itself was a failed attempt to solve the hum issue.
For this reason, the presence of mods is an important data point. You should pay special attention to any components that are not original to the amplifier. Try to determine why the mod was installed and whether it was installed successfully. Make sure electrolytic capacitors were installed with respect to their polarity. Make sure any non-original grounds are soldered to an appropriate place. If there’s an issue with the design or execution of the mod, reversing it could improve the amp’s noise floor.
When your amp isn’t working correctly, anything that has clearly been disconnected is definitely a source of suspicion. This power transformer is from a Wurlitzer 200a amplifier.
Ensure that all grounds are firmly connected. A loose ground can introduce hum. Check that all grounds are well-connected with good solder joints. You can also test ground points for continuity with a multimeter, although this may not identify grounds that are connected only intermittently.
Identify if any grounds have been adjusted or moved by a previous user. The grounding scheme of an amplifier is very important, and moving grounds around indiscriminately can introduce ground loops. In fact, many vintage amplifiers have ground loops due to their stock wiring. You may want to experiment with new grounding schemes that could eliminate ground loops and lower the noise floor.
Note that experimenting with grounds should be done after you’ve replaced the filter capacitors and any other suspicious components. Adjusting grounds can sometimes result in valuable but incremental improvements in the noise floor that you may not be able to hear if there is a failed component causing the lion’s share of the noise.
Step 4: Examine the amplifier for original design flaws.
A Wurlitzer amp - or any vintage amplifier - can be noisy due to the way that it was put together at the factory. Digital recording techniques have given us all very high standards for the noise floor in our electronic instruments. However, this wasn’t always the case - particularly during the 1950s and 1960s, when the earliest Wurlitzers were manufactured. Furthermore, some noise-reduction techniques, including center-tapped heaters, were not widespread at the time. For this reason, even the stock wiring on vintage amplifiers can introduce noise into the circuit.
This Wurlitzer 700 amplifier has a very good noise floor, even in its original condition. Its point-to-point wiring is very organized and it has a cathode bypass capacitor (the topmost orange electrolytic) on the input triode. Note that the heaters are not twisted or center-tapped, however.
Here are some things that you should look for:
Variations in point-to-point wiring. All Wurlitzer tube amplifiers featured point-to-point wiring. Like anything handmade, there is some variation between the quality of the wiring in some amps. Some amps are neatly organized, while others have longer signal runs and other wiring that may benefit from re-routing or modification.
Electrolytic capacitors installed backwards. In some positions, an electrolytic capacitor that was installed with its polarity reversed will fail instantly. But in other positions, backwards capacitors will reduce volume and possibly cause noise issues. We have found backwards electrolytic capacitors that appear to be original in student-model 206 Wurlitzers. These keyboards may have never worked properly, since they belonged to schools - which may have had dozens of keyboards - under circumstances where this flaw may have gone under the radar.
Non-center-tapped heaters. Tube heaters are a high-current ac circuit, so they can easily introduce hum into adjacent wiring through capacitative coupling. The best way to prevent heater hum from entering the circuit is to add a center-tap, which reduces the hum by cutting the heater voltage that each pin receives in half. Heater wires should also be routed to the tubes via a path that is short, direct, and avoids creating large loops around the tube socket.
Unfortunately, heaters in Wurlitzer electronic piano tube amps are neither twisted nor center-tapped. Note that many Wurlitzer amps with original heater circuits have a usable noise floor, but revising the heater circuit can lower it even further. Therefore, if your hum problem is significant, re-doing the heaters is unlikely to cure it. However, if your hum sounds more annoying than catastrophic, adding a center-tap and twisting the heaters may be worthwhile.
A center-tap is usually accomplished via a wire already built into the power transformer. However, if a transformer doesn’t have a built-in center-tap, you can create one by adding two resistors, each about 100 ohms. Each resistor should connect one leg of the heaters to ground. Make sure that you remove the existing heater ground before installing a center tap. *More information on heater circuits can be found here.*
No cathode bypass capacitor on the input triode. In addition to wreaking havoc around the amp chassis, heater filaments can actually introduce noise inside the tube itself. Because the job of the heater is to heat the cathode until thermionic emission is possible (aka the point where electrons jump off the cathode and rush towards the tube’s plate), it is located physically close to the cathode within the tube. Although there is some insulation between them, this is often not sufficient to prevent crosstalk. Because any signals at the cathode circuit are reproduced at the plate, this is enough to introduce hum into the signal.
Adding a high-value bypass capacitor of 25 uf or more to the input triode helps decouple the cathode from the filament, preventing heater hum from entering the circuit. Wurlitzer even mentioned this in a 120-era service memo, recommending that techs add the capacitor to any Wurlitzer they encountered that did not already contain one.
Ground loops. If two grounds are not at the same potential, a small current may develop between them. This could cause audible noise.
One way to avoid ground loops is to attach all of a circuit’s signal grounds to one place. However, a coherent ground scheme is rare in vintage amps. In vintage point-to-point circuits (including Wurlitzer tube amps), components were grounded to the nearest convenient metal protrusion. When restoring these amplifiers, we rearrange existing grounds into a more organized scheme that avoids ground loops. However, in a PCB amplifier, it is more difficult to move ground connections. In many cases, you are stuck with the PCB’s original design.
Step 4: Using the observations that you’ve made in the previous steps, test and replace components.
If rerouting wires and making other non-invasive changes did not improve the noise floor, now is a good time to replace components. Focus on areas that you’ve identified as suspicious in the previous steps. Try not to replace too many components at one time. If you make a mistake, it is easier to retrace your steps when you work incrementally.
Note on Replacing Components
Before you begin replacing components, check out our complete replacement component kits for all Wurlitzer electronic pianos in our shop. Sourcing the components is sometimes the most time-consuming part of repairing an amp, so we’ve collected all of the best new components for Wurlitzer keyboards in one place. These are the same components that we use in our own restorations, and they’re all hand-picked for suitability in the point-to-point or vintage PCB circuits that they are intended for.
Clean up the wiring harness. Signal wires should be short and direct. Wurlitzer wiring harnesses violate this rule. They feature long runs to potentiometers using wires routed adjacent to mains wiring (to the switch and indicator light) as well as output wiring (to the headphone jack). This is particularly true for early console models like the 700 and 720, which tend to have even longer wiring harnesses.
Move the wires around, separating volume pot wires from the other wires, and see if that improves the noise floor. We have also occasionally had good results replacing the entire wiring harness.
The filter capacitors in a Wurlitzer 200 amplifier. Note that the right capacitor is physically leaking.
Change the filter caps. The job of the filter caps is to filter DC ripple out of your amplifier. (Click here for a quick discussion on what the filter caps are doing in your amplifier.) If the filter caps aren’t doing their job, you have unfiltered DC current traveling around your amp. This can contribute to hum.
Unfortunately, changing the filter caps is not a magic bullet. If the caps were just old but not deteriorated, changing them out probably won’t affect the noise floor very much. However, old filter caps can cause problems when they fail, and if your new vintage amp is suddenly getting a lot of use after years in somebody’s basement, they may fail sooner rather than later. So, changing the filter caps in your Wurlitzer’s amp might improve your hum problem, but it will definitely improve your Wurlitzer’s reliability.
Test suspicious components for failure. Here’s where things start to get a little random. Like we said, we’re assuming that the only piece of test equipment that you have is a multimeter. So, absent more sophisticated test equipment, this is the point where you take all of the observations that you made in all of the previous steps, and try to apply them in a way that fixes your problem before you find yourself replacing every component in the amp one-by-one.
For instance, if the volume knob increases the hum, pay special attention to the early preamp. If it doesn’t, look at the later part of the circuit. Or, if some of the components looked deteriorated when you examined them during an earlier step, check out their neighbors. Was there something about the environment in that portion of the chassis - a hole, evidence of a spill - that might have made the components deteriorate? Do components look high-quality? Do they look cheap? Do they look dusty? Do they look suspiciously clean and new?
Some vintage components are inherently noisy, and become even more noisy as they start to fail. These components include carbon resistors and ceramic capacitors. Identify them in the circuit and treat them with suspicion.
To evaluate suspicious resistors or capacitors, remove at least one lead from the circuit and test the component with a multimeter. (Make sure all capacitors have been discharged first.) Many vintage components have large tolerances, so if your reading is within 20% of its stated value, it’s probably still good. If the component had a tolerance closer than 20%, it was special and expensive and likely displayed that data point somewhere on the label, so look closely.
If the component measures outside of its tolerance, it should be replaced. If it’s found in more than one place in the circuit, test all incidences of that component, in case its failure was due to a design flaw in the batch.
Of course, the circuit probably has lots of suspicious characters: carbon resistors, ceramic capacitors, old and dirty components. You definitely don’t want to replace everything. Even if you narrow it down to components before or after the volume knob, you’re still looking at a good handful of components. So where should you start?
Examine areas that get hot.
A resistor is built to dissipate heat, and its wattage rating is a measure of how much heat a given resistor can handle. Most resistors in a vintage amp will be rated for a half-watt. If you see a resistor that is physically bigger than average, it’s probably because that resistor is rated for more wattage than the rest of them. That’s a good indicator that the designer expected it to experience more heat and more stress. And how would you feel if you were consistently hot and stressed for 40+ years? Probably ready for retirement: just like the high-wattage resistors in your amp.
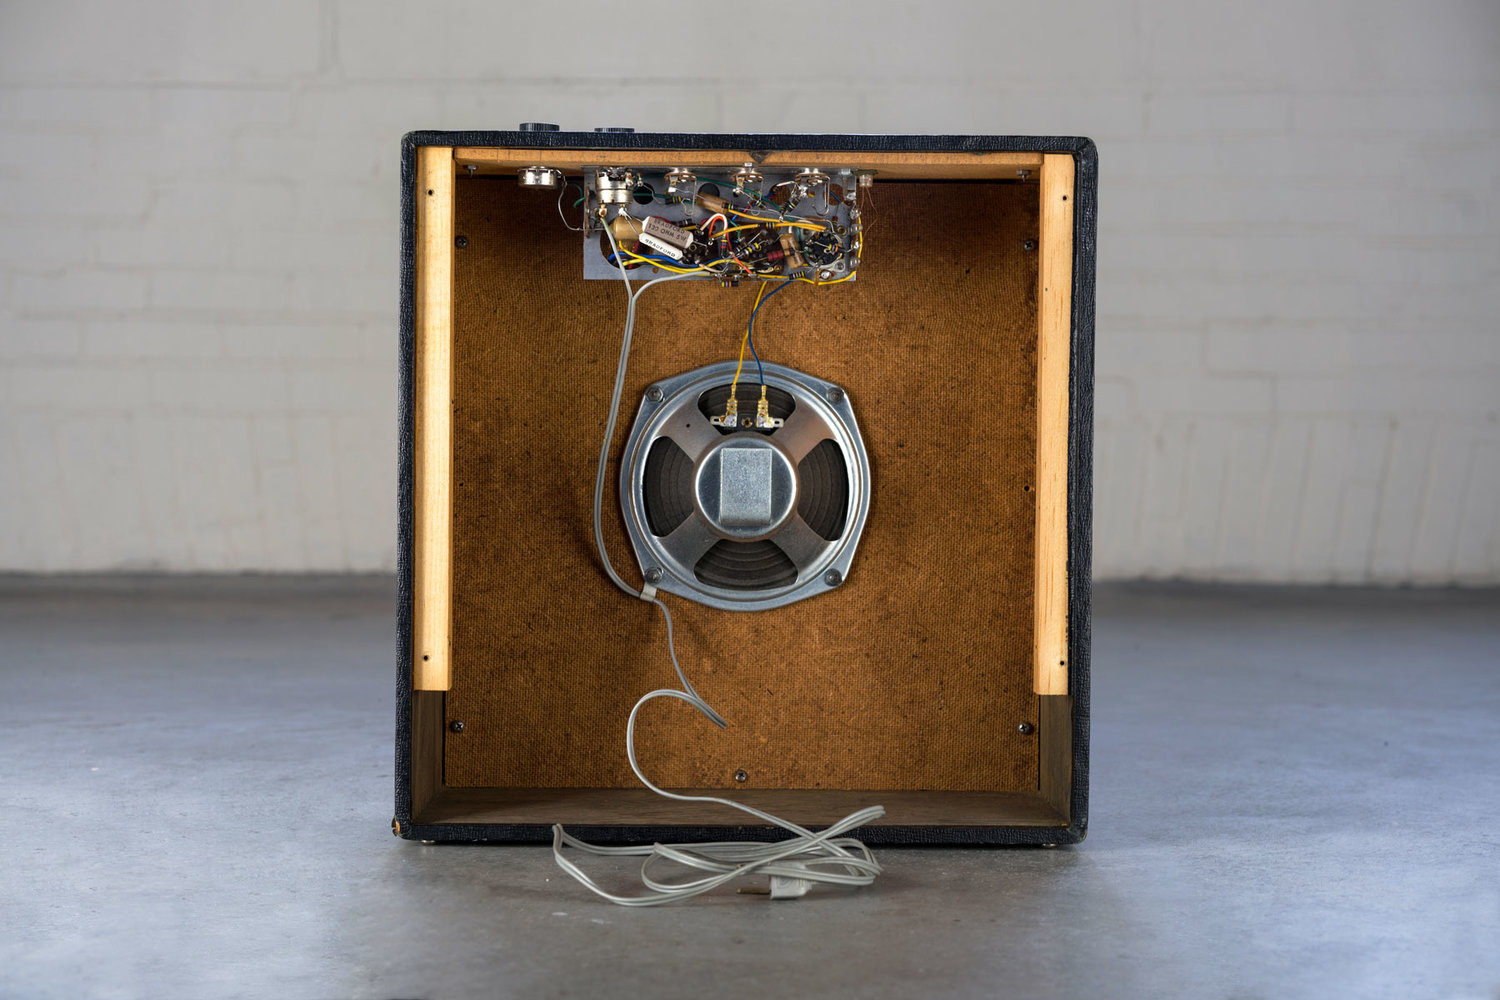
These high-wattage resistors, found in a Wurlitzer 140b amplifier, are part of the power transistor biasing circuit.
These resistors are usually found in the power supply, on the plates of the preamp tubes, and near the output tubes. Today’s high-wattage resistors are smaller and built to have less inherent noise, so don’t feel bad about replacing the originals in your amplifier. We replace high-wattage resistors as a matter of course, and all of our basic replacement component kits include the high-wattage resistors as well.
If there’s a capacitor in the neighborhood - for instance, in parallel or in series with a high-wattage resistor - you may want to test it, particularly if you need to lift one of its leads to replace the resistor. It may also be stressed and ready for replacement.
In early Wurlitzers, there’s usually a high-wattage resistor on the headphone jack. This resistor is meant to be a stand-in for the impedance of the speaker, so the output transformer isn’t stressed out when the user cuts the speaker by inserting a pair of headphones. This resistor is often deteriorated, but even in good condition it can introduce noise to the circuit. You can take the jack and the resistor out of circuit and test if its absence improves the noise floor, but don’t accidentally cut the lead to the speaker itself. An output transformer requires a speaker load, turning on an early Wurlitzer without a speaker connected can damage the amplifier.
Examine sensitive preamp areas.
If a component fails and starts to introduce noise, the effect is magnified if the component is located in certain early parts of the amplifier, where the noise can easily enter the signal path. Possibly the most sensitive components are those located between the input and the grid of the first preamp tube. Wurlitzers can have four or five components here, which provides quite a few opportunities for noise to enter. Unlike a guitar amplifier, a Wurlitzer also sends voltage to the input, which is an additional stress on early-circuit components.
The input in a Wurlitzer 140b amplifier.
Other inputs, such as a Wurlitzer’s record/phono input, are also sensitive, as are components located along the signal path generally. Old coupling caps can be a source of noise, particularly if they are ceramic. Potentiometers in the signal path, such as the volume pot, might also be a culprit. After all, potentiometers are only resistors, and they face more stress due to their moving parts.
Miscellaneous advice
Don’t forget to check the cathode circuits, particularly early in the preamp. Cathode components that have drifted in value can be a source of noise. Cathode bypass capacitors are usually electrolytic and can dry out in the same manner as filter caps.
Be careful that you don’t take the concept of the “signal path” too literally. Components across the amplifier can interact in unpredictable ways. Just because a component is deep within the vibrato circuit, for instance, doesn’t mean that it can’t introduce noise if it fails.
Take components out of circuit to eliminate them from suspicion wherever possible. If you remove a group of components from the circuit and the amp stops humming, there’s a pretty good chance that the problem is somewhere within the absent components. We’ve discussed removing auxiliary circuits such as the phono input or vibrato circuit earlier in the article. However, if you’re clever with re-wiring, you can remove entire gain stages or even create a preamp output to bypass the phase inverter and output stages of the amp. Specifics on how to accomplish this safely are outside the scope of this guide, but it is included here because it can be a useful diagnostic strategy.
What if my amp never stops humming?
If your amp still has hum, you should read through the steps again and try them again later, after you’ve taken a break and can give the project renewed enthusiasm. You may have missed something that will become obvious the second time around. It is true that the longer you spend with the amplifier, the more you’ll notice, particularly if the amp is hand-wired point-to-point. When the layout is a little chaotic, it’s easy to overlook problems that would have looked like flashing red flags in a more organized amplifier.
If you feel that you’ve followed the steps to the best of your ability and the amp still doesn’t work, there’s no shame in hiring an tech to complete the repair. Sometimes, just having a fresh set of eyes on a problem can lead to a fast solution. The tech will also have diagnostic tools and the experience to solve your problem with the least amount of unnecessary component replacements.
If you need help repairing a vintage amplifier, contact us or describe your problem below. We may be able to make suggestions to reduce the noise in your amplifier.
Further Reading
Browse all of our articles on restoring vintage gear. Or, click on an image below.